概要
Security-Hubのアラートを、SNSを介してユーザに通知する方法を示します。
Security-HubはEventBridgeにアラートを通知するので、EventBridgeがSNSを起動するように、EventBridgeを設定します。
すると、Security-HubのアラートがEventBridge 、SNSを介してSNSの登録メールアドレスに送信されます。
Security Hubの概要
AWS Security Hub は、セキュリティのベストプラクティスのチェックを行い、アラートを集約し、自動修復を可能にするクラウドセキュリティ体制管理サービスです。
AWS Security Hub を使用すると、セキュリティのベストプラクティスのチェックを自動化し、セキュリティアラートを単一の場所と形式に集約し、すべての AWS アカウントで全体的なセキュリティの体制を把握することができます。
SNSの作成
SNSの作成方法は省略します。
EventBridgeの設定
EventBridgeがSNSを起動するように、EventBridgeを設定します。
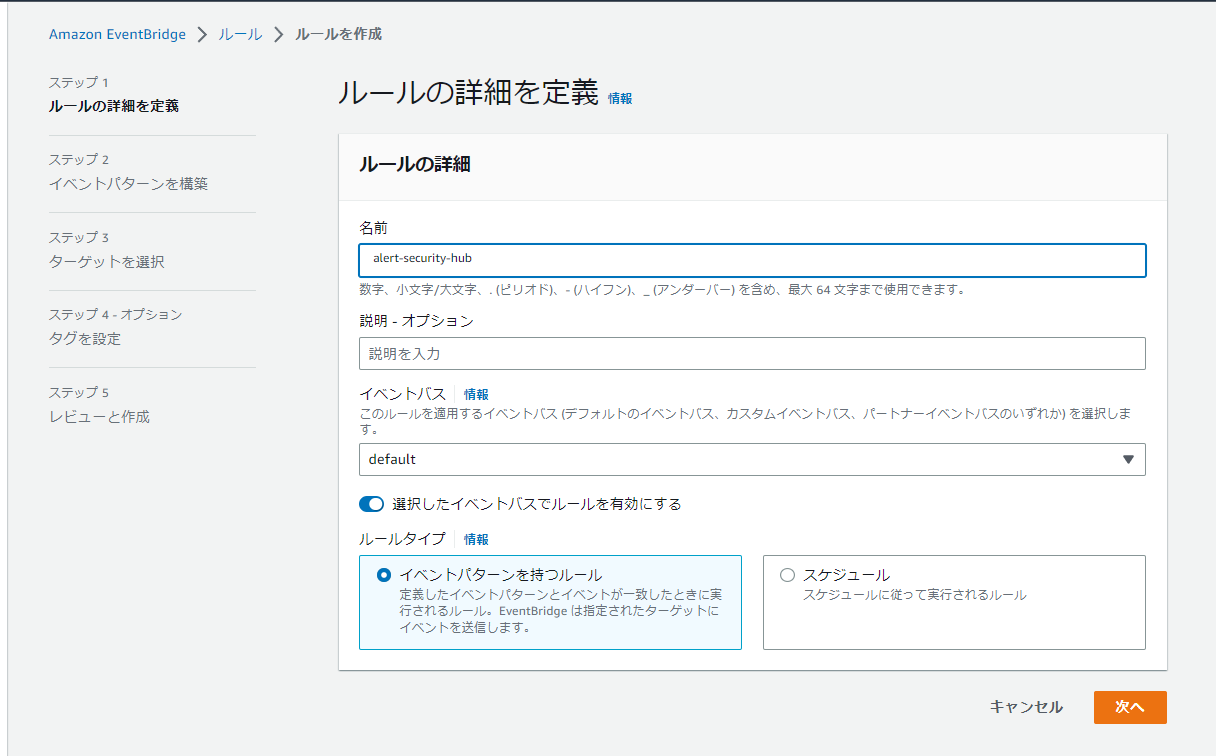
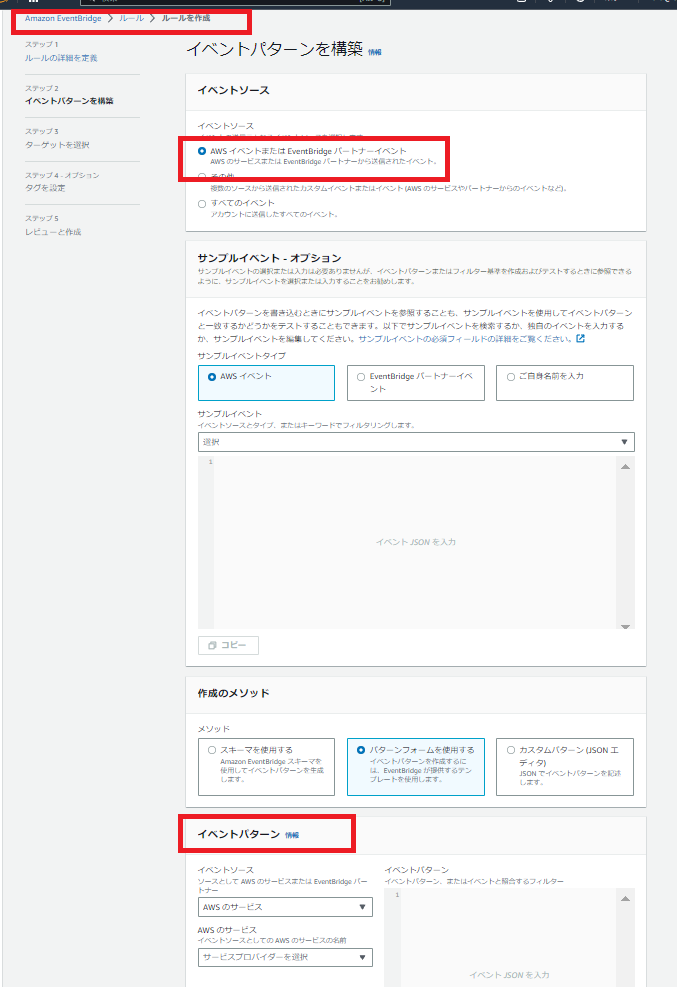
イベントパターンを以下のようにしました

イベントパターンの内容
{
  "source": ["aws.securityhub"],
  "detail-type": ["Security Hub Findings - Imported"],
  "detail": {
    "findings": {
      "Compliance": {
        "Status": ["FAILED", "NOT_AVAILABLE", "WARNING"]
      },
      "RecordState": ["ACTIVE"],
      "Severity": {
        "Label": ["HIGH", "CRITICAL", "MEDIUM"]
      },
      "Workflow": {
        "Status": ["NEW"]
      }
    }
  }
}
[次へ]をクリックします

入力トランスフォーマの設定
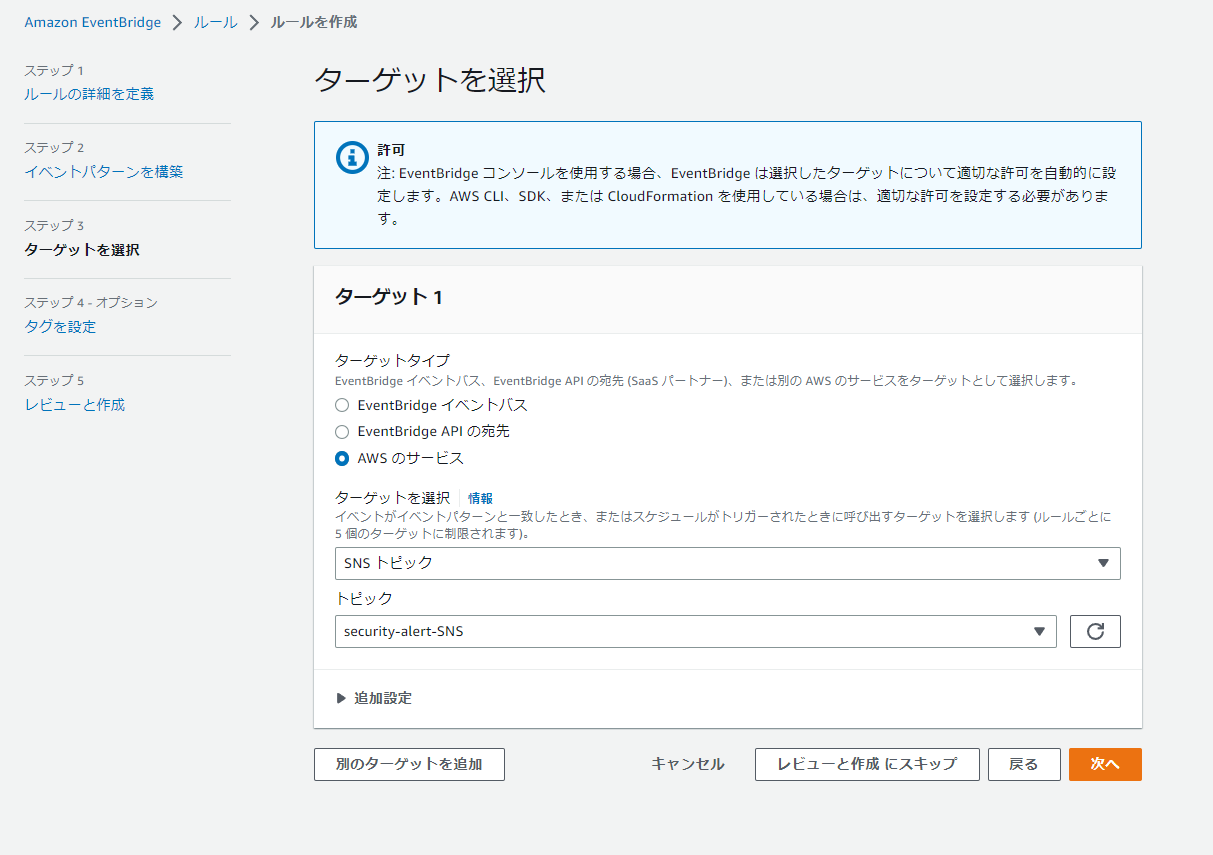
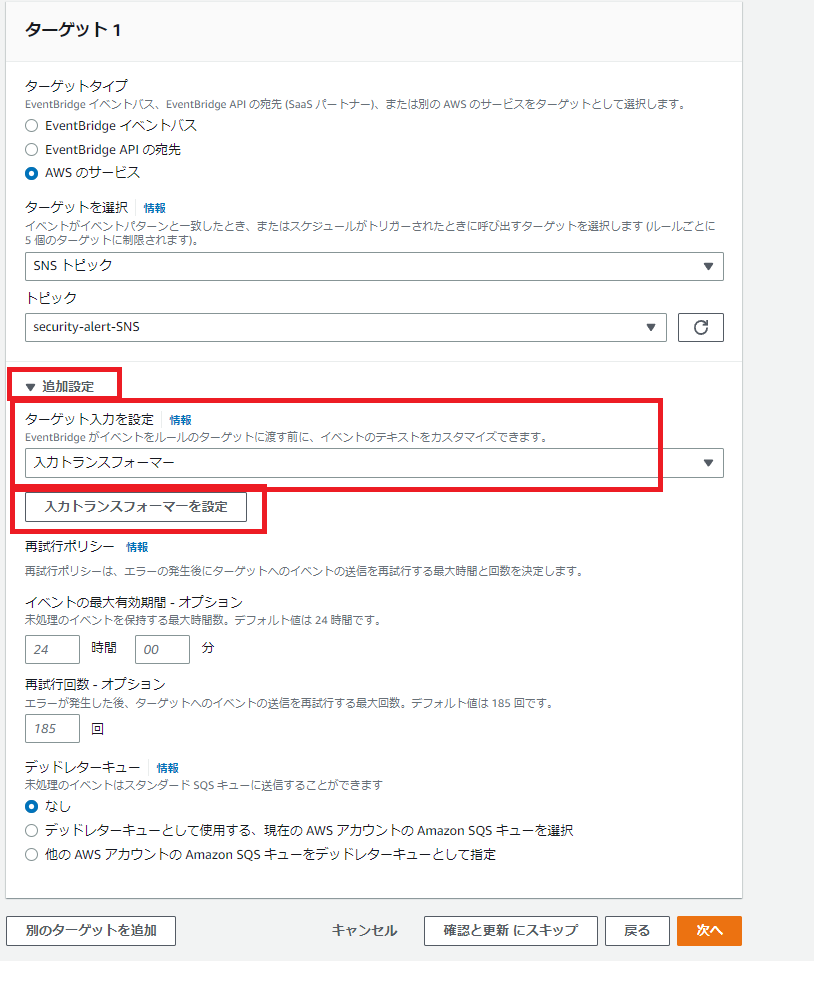
作成されたルールのターゲットを編集します
ターゲットの追加設定をクリックし、
[ターゲット入力を設定]に[入力トランスフォーマ]を選択し、
[入力トランスフォーマを設定]をクリックします。
入力トランスフォーマの入力パスと入力テンプレートを以下のように設定します。
入力テンプレートの各行の両端を”で囲ってください。
[確認]を押して保存してください。
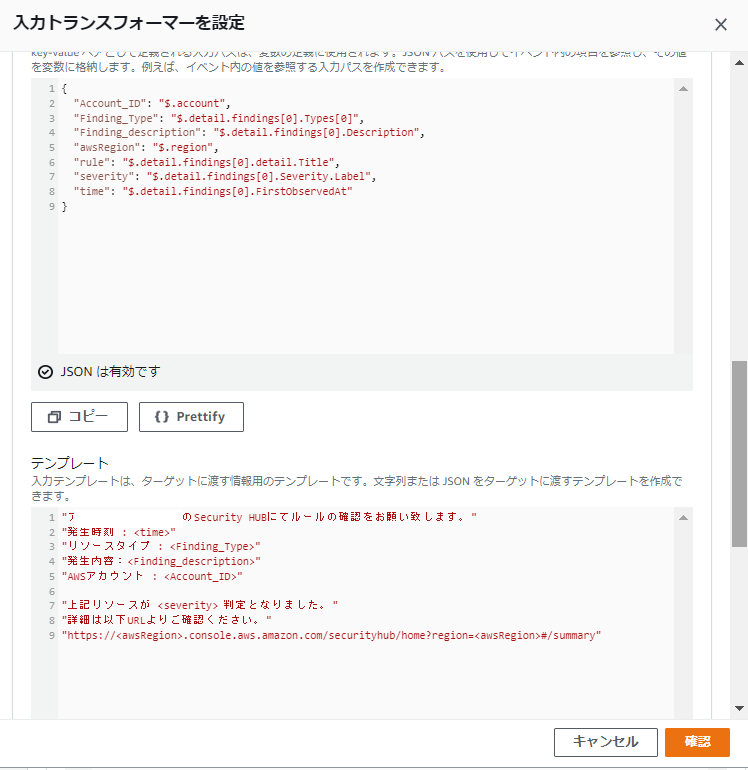
入力トランスフォーマの入力パスの内容
{
  "Account_ID": "$.account",
  "Finding_Type": "$.detail.findings[0].Types[0]",
  "Finding_description": "$.detail.findings[0].Description",
  "awsRegion": "$.region",
  "rule": "$.detail.findings[0].detail.Title",
  "severity": "$.detail.findings[0].Severity.Label",
  "time": "$.detail.findings[0].FirstObservedAt"
}
入力トランスフォーマのテンプレートの内容
"アカウント1234-1234-1234のSecurity HUBにてルールの確認をお願い致します。"
"発生時刻 : <time>"
"リソースタイプ : <Finding_Type>"
"発生内容:<Finding_description>"
"AWSアカウント : <Account_ID>"

"上記リソースが <severity> 判定となりました。"
"詳細は以下URLよりご確認ください。"
"https://<awsRegion>.console.aws.amazon.com/securityhub/home?region=<awsRegion>#/summary"
入力パスの設定方法の確認

サンプルイベントとして
Security HubFindings – Importedを選ぶと以下のように表示されます。
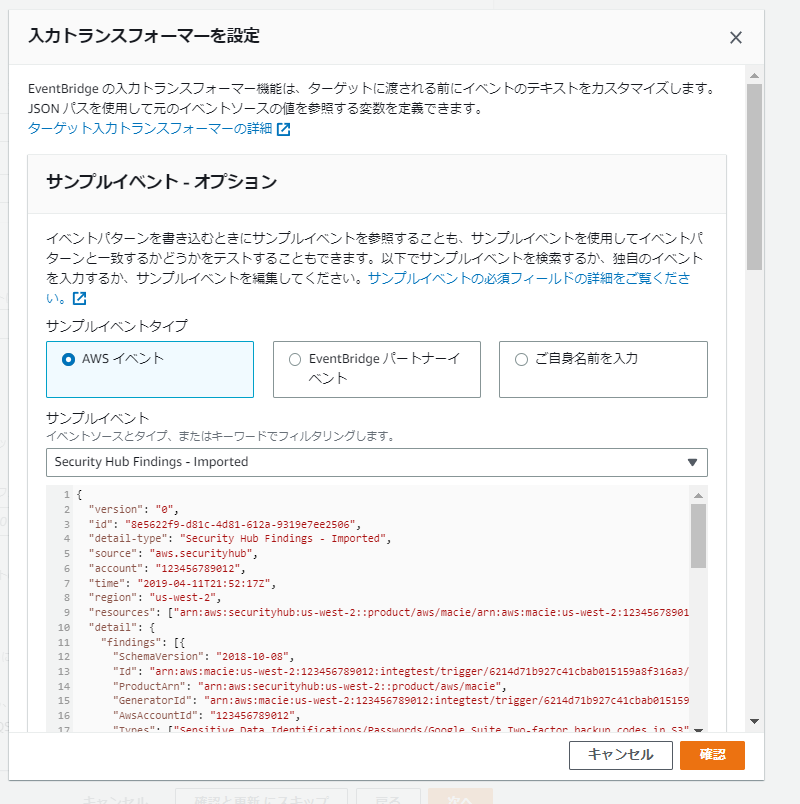
サンプルイベントの内容
{
  "version": "0",
  "id": "8e5622f9-d81c-4d81-612a-9319e7ee2506",
  "detail-type": "Security Hub Findings - Imported",
  "source": "aws.securityhub",
  "account": "123456789012",
  "time": "2019-04-11T21:52:17Z",
  "region": "us-west-2",
  "resources": ["arn:aws:securityhub:us-west-2::product/aws/macie/arn:aws:macie:us-west-2:123456789012:integtest/trigger/6294d71b927c41cbab915159a8f326a3/alert/f2893b211841"],
  "detail": {
    "findings": [{
      "SchemaVersion": "2018-10-08",
      "Id": "arn:aws:macie:us-west-2:123456789012:integtest/trigger/6214d71b927c41cbab015159a8f316a3/alert/f2893b211841467198cc1201e9031ee4",
      "ProductArn": "arn:aws:securityhub:us-west-2::product/aws/macie",
      "GeneratorId": "arn:aws:macie:us-west-2:123456789012:integtest/trigger/6214d71b927c41cbab015159a8f316a3",
      "AwsAccountId": "123456789012",
      "Types": ["Sensitive Data Identifications/Passwords/Google Suite Two-factor backup codes in S3"],
      "FirstObservedAt": "2019-04-11T21:52:15.900Z",
      "LastObservedAt": "2019-04-11T21:52:15.900Z",
      "CreatedAt": "2019-04-11T21:52:15.900Z",
      "UpdatedAt": "2019-04-11T21:52:15.900Z",
      "Severity": {
        "Product": 6,
        "Normalized": 15
      },
      "Confidence": 5,
      "Title": "Google Suite Two-Factor Backup Codes uploaded to S3",
      "Description": "Google Suite two-factor backup codes uploaded to S3....",
      "Remediation": {
        "Recommendation": {
          "Text": "v2 Release"
        }
      },
      "ProductFields": {
        "rule-arn": "arn:aws:macie:us-west-2:123456789012:trigger/6214d71b927c41cbab015159a8f316a3",
        "tags:0": "DATA_COMPLIANCE",
        "tags:1": "BASIC_ALERT",
        "themes:0/theme": "google_two_factor_backup",
        "themes:0/count": "1",
        "dlpRisk:0/risk": "8",
        "dlpRisk:0/count": "1",
        "owner:0/name": "vchin",
        "owner:0/count": "1",
        "aws/securityhub/FindingId": "arn:aws:securityhub:us-west-2::product/aws/macie/arn:aws:macie:us-west-2:123456789012:integtest/trigger/6214d71b927c41cbab015159a8f316a3/alert/f2893b211841467198cc1201e9031ee4",
        "aws/securityhub/SeverityLabel": "LOW",
        "aws/securityhub/ProductName": "Macie",
        "aws/securityhub/CompanyName": "Amazon"
      },
      "Resources": [{
        "Type": "AwsS3Bucket",
        "Id": "arn:aws:s3:::test-bucket-12",
        "Partition": "aws",
        "Region": "us-west-2"
      }],
      "RecordState": "ACTIVE",
      "WorkflowState": "NEW"
    }]
  }
}
サンプルイベントの表示内容を参考にして入力パスに好みのパラメータを追記することができます。
(ただし、サンプルイベントにすべてのパラメータが記載されているわけではなく、あくまでサンプルです。
そこで後述する、実際の検出結果を元に、入力パスのパラメータを設定する方法もあります。)
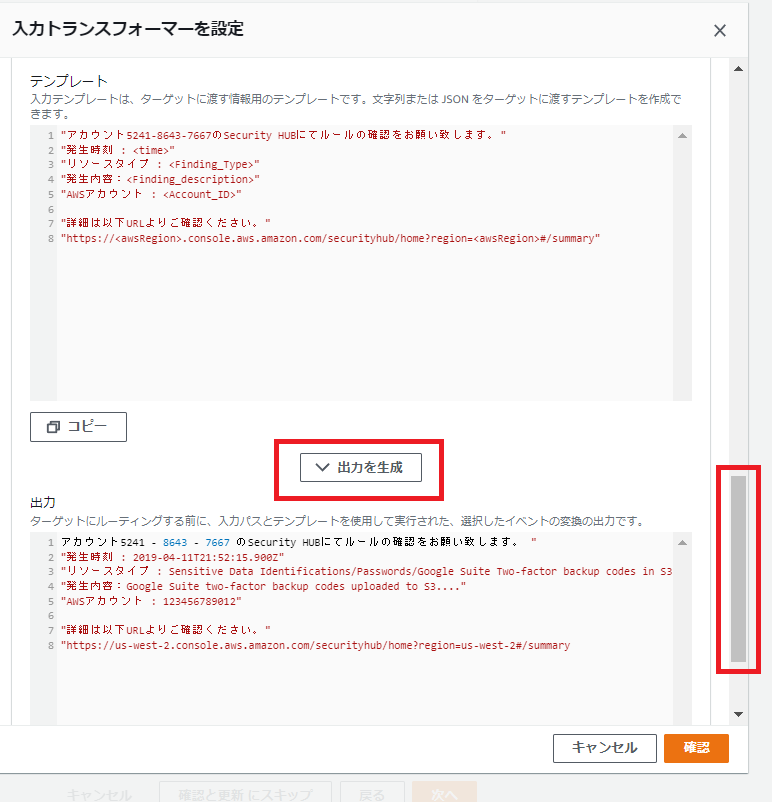
サンプル出力の確認
入力トランスフォーマの下部の[出力を生成]をクリックすると、テンプレートに応じた出力例が表示されます。
これを参考にテンプレートを編集してください。
Security Hubの検出結果を参考に入力トランスフォーマを決める
前述のようにサンプルイベントを参考に、入力トランスフォーマの入力パスを設定しますが、Security Hubの検出結果を参考にすることもできます。
Security Hubの検出結果のタイトルをクリックします。
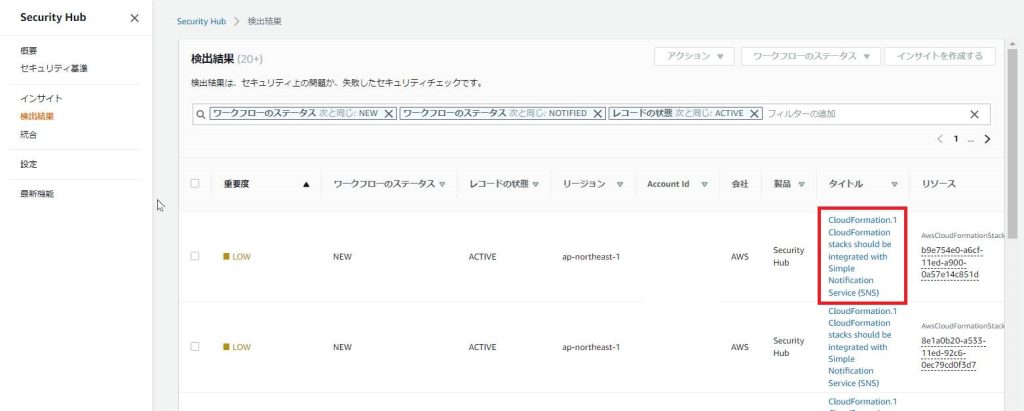
右に詳細が表示されます。
そこのFinding IDをクリックします。
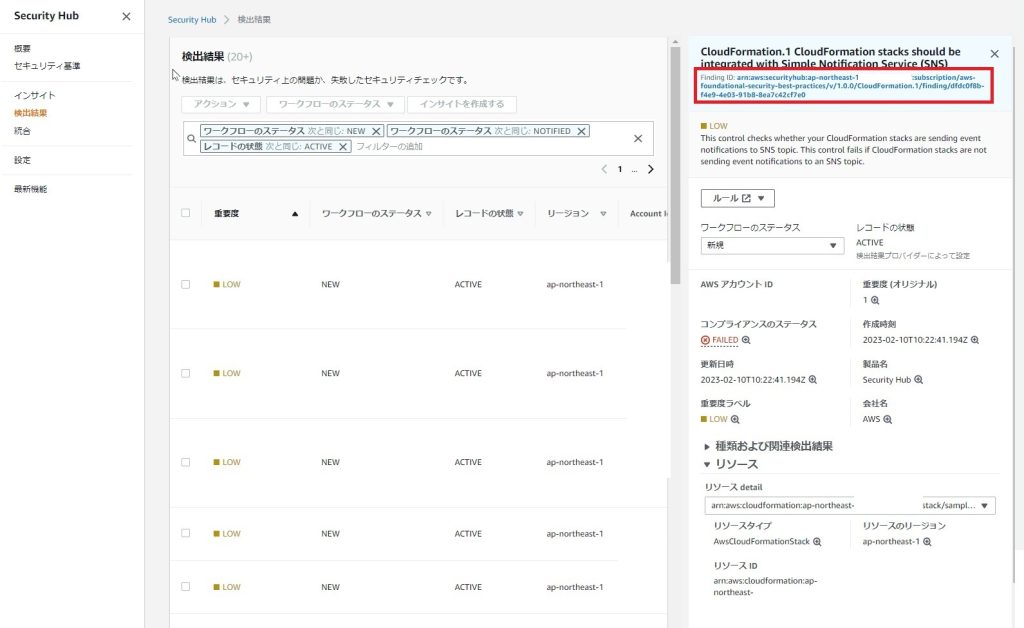
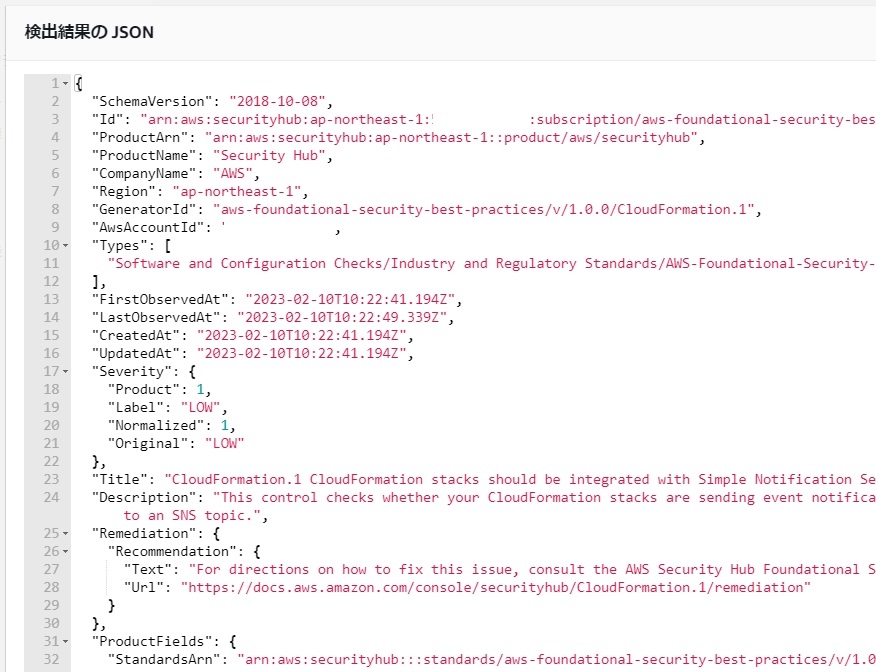
検出結果のJSON形式が表示されます。
これを元に入力パスのパラメータを設計することもできます。
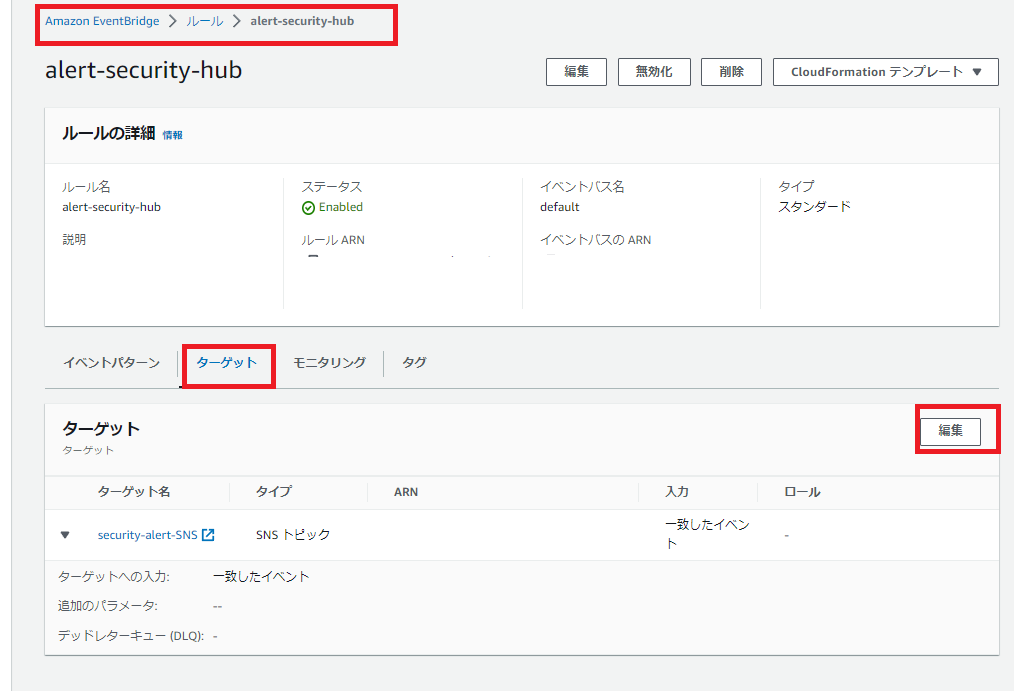
EventBridge Ruleの作成完了
これでEventBridge Ruleは作成完了です。
AWS Configが異常を検知すると、AWS Config はEventBridge Ruleを起動し、EventBridge RuleはSNSを起動し、ユーザに異常通知のメールが届きます。